I’ve Got a Few (Stolen Beauty) Tricks Up My Sleeve

I’ve got three beauty tricks up my sleeve, and I can’t claim any of them!

Normally, I am not a lots-o-makeup-wearing, girly girl.  I like sleep, and I don’t like the way I look with heavy foundation.  I’m a powder, blush, one color eye shadow, and mascara kind of girl on work days.  On weekends, I’m an “I took a shower, what more do you want from me?” kind of girl.  That’s why I like the three beauty tricks below.  It even gets utilitarian minded me excited about makeup!

The first trick comes from pinterest, and the rest come from the makeup artist who did the makeup for my friend’s wedding party.


1. I read another blog about DIY makeup setting face spray.  I’m not sure how intellectual property laws work, or about blog etiquette, so I’m not linking to it.  I’ve seen and read in beauty magazines about makeup setting spray; I haven’t been willing to invest in any.  Urban Decay sells three different types (oil control, moisturizing, and long lasting) for $29, so it was worth it to me to try this recipe to make my own!

Ingredients:

Pure glycerin (pure aloe would work, too)- My mom works at Kroger Pharmacy, and they ordered my the 6 oz. bottle shown for $8 (no shipping!).  Your local pharmacy can order it from their overnight supplier.  I ordered mine Wednesday night and got it Thursday morning: so fast and easy!

Filtered water- I used the stuff that comes out of my fridge dispenser.

A spray bottle- mine is 3 oz. and is 97 cents at Target!

Ratios:

Dry Skin: 2 TBSP glycerin and 4 TBSP water

Combo Skin: 1 TBSP glycerin and 3 TBSP water

Oily Skin: 1 TBSP glycerin and 4 TBSP water

Notes:

All you do is mix, and then shake it before each use.  Why it works: glycerin is moisturizing, which allows your face to stay hydrated.  It also bonds with the makeup, setting your face.  I use Bare Minerals and find that sometimes I look a little powdery/cakey.  I think it’s because my skin is uber dry.  I mixed mine for dry skin, and find that this gives me the perfect dewy glow all day, without looking oily.  I also spray it on my face in place of moisturizer, when I feel I need it.  Glycerin can be used on hair, too.  One word of caution: I made the mistake of spraying before makeup and twice after makeup.  OVERKILL.  I think I also missed my face, and my hair looked oily that day.  So cheap, I’m in love already!

The only ingredients needed for DIY makeup setting spray: water, pure glycerin, and a spray bottle!


2. You know that expensive eye primer cream?  Yeah, I shelled out quite a few bucks for some of that.  The makeup artist for my friend’s wedding said she just uses Chapstick.  Chapstick.  Plain, old Chapstick.  She said she’s used both, and Chapstick (she used the cherry kind, and it smelled good!) works just as well.  I have to say that my eye makeup looked just as good at the end of the night, in spite of crying, sweating, and cold wind.  I went out and bought the moisturizing kind just to keep in my makeup bag for my eyes!


This is all you need to keep eye makeup in place!


3. This fabulous makeup artist also introduced me to gel eyeliner.  I’ve been using a pencil, because I look like a kindergartner’s art project gone wrong when I use liquid.  But I like the look of liquid!  But pencils (especially the kind you just twist up) are so easy!  She let me use her Maybelline Gel Eyeliner to do my own eyeliner (I’m not so good at the sitting still).  I loved it!  It went on smooth and easy.  It went on straight, and I could easily fix any hiccups.  It looked great, like liquid, and was even easier than my pencil.  No more rubbing my skin off with a stubborn pencil, or looking like a hot mess with liquid.  I went out and bought some of this the next day at Target for about $8.  It came with a brush and everything!  It’s small, but the makeup artist said she’s had hers for months, so it will last a while.    Get Maybelline’s here.  MAC also makes one for $15 that you can get here.


So smooth and easy! Looks like liquid, but is easier than pencil!


When I’m done being sick, I may post a pic of me utilizing all three makeup tricks!



Etsy Hack: Knit Button Cowl

You’ve heard of an Ikea hack.  Now, I’m introducing the Etsy hack.  While browsing Pinterest, I came upon an adorable cowl/scarf/neck warmer.  (Its creator calls it a scarf, but to me it looks more like a cowl/neck warmer than a scarf, except that it is not an infinity cowl).  It was perfect!  I’ve been looking for a new knitting project for Christmas gifts.  Last year, I made hats.  Scarfs normally take a L-O-N-G time, but this one is a shorter version and oh-so-adorable!  I clicked and saw this beauty.

I love this adorable cowl! I just had to try to make one!

When I arrived at Etsy, I found this 12″ by 36″ beauty is being sold for $74.  No, ma’am.  I am not paying that much for something I could make myself, and how much cooler is it to say I made it?Often times people who knit offer a pattern for their creations that can be purchased, so I was hoping to find that for this scarf.  No dice.

No worries, I’ll just scour the internet for a similar knit stitch and try to create it myself with trial and error!  SPOILER ALERT: I figured it out, and my perfected  pattern is at the end.  I found, via Ravelry, a “lace knit stitch”.  Now, this is by no means lace, but a lace stitch can refer to any open knit stitch.  The best part?  It is so easy and a very quick knit.  I discovered this cowl on Monday and have knit three prototypes since then (no, I do not have oodles of time on my hands- I work and go to school!).

For my first try, I thought of my wonderful friend Minna.  She’s my friend, my hairdresser, and my photographer.  Last year, I knit her some fingerless gloves with chunky rainbow yarn, and I figured I had just enough left over to knit this cowl.  Here’s how it went in pictures.

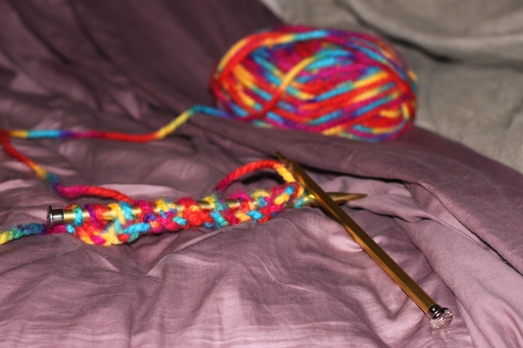
Here is the birth of the cowl: I cast on 20 stitches  of chunky yarn on size 15 needles.

I knit it with a pattern of K1, *Yo, K2Together* repeat from* until one stitch left,  K1.

It took me about two hours, and the hardest part was adding the buttons!

It looks more like a gator than a cowl, but I still think it is cute!!!

Here I am wearing the cowl knitted for Minna!

So it didn’t turn out exactly like the picture, but I love how it came out!  It’s warm, but breathable, since it was knit with the open stitch.  Minna loved it, too!  She’s even going to wear it in her maternity photo shoot!  I’ll post some of those pictures when she gets them to me!

Next, I grabbed left over matching yarn left over from another friend’s Christmas hat.  This time, I cast on 26 stitches of chunky cream colored yarn and knit until I was almost out of yarn.  This one turned out to be about 10 inches wide and 25 inches long.  Pretty great!  I think she’ll love it!  No pic of that one, because I want it to be a Christmas surprise!

My mom is my third guinea pig.  I knit her a cabled beret and this cowl would look great with it, especially since she is traversing to Nebraska in a couple of weeks!  This time, I wanted it to be as damn close to the picture as I could manage.  I cast on 30 stitches this time to make it a little bit wider.  I thought I could do it with one skein of chunky yarn, but since this one is wider (about 13″ wide), I needed another skein to get the length right.  One skein knitted a length of about 20″, so two skeins made it about 42″.  Longer than the Etsy one, but I like it!  I knit until I was out of yarn, then added the buttons!  I am ever so proud of myself for my Etsy Hack!

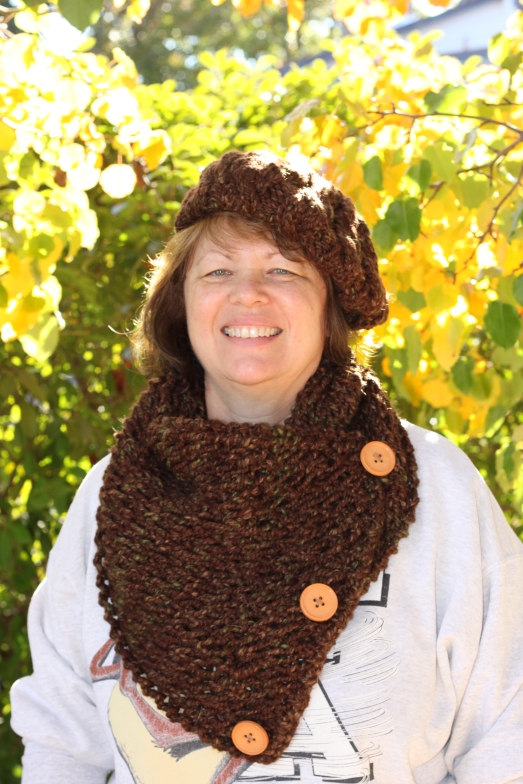
Here is my mom wearing her matching set:

This is my lovely mom wearing the cowl (nailed it!) and hat I knit for her.

Etsy Hack: Knit Cowl Pattern

Ingredients:

US Size 15 needles

2 Skeins of chunky yarn (My mom’s is knit in Lion Brand Wool Ease Thick and Quick in color 502 Mesquite, which is 80% Acrylic & 20% Wool)

Abbreviations:

K1= knit one

yo=yarn over (so simple, literally just wrap the yarn around the right hand needle from front to back, creating a new stitch

K2Together= knit the next two stitches together

Pattern:

1. Cast on 30 stitches- that will knit a scarf about 13″ wide  (If you want it wider or thinner cast on less, just be sure it is an even number!)

2. For every row, K1 *yo, k2together* repeat until there is one stitch left, K1 (You will always knit the first and last stitch of every row!)

3. When you almost run out of yarn, bind off.

4. Weave in ends and add buttons, voila!

Notes:

First, this scarf is very stretchy, which makes it hard to measure, but wonderful for creating different styles when it is worn.  I also wanted to explain a bit about the pattern.  The reason for the yarn over is to create a new stitch, since two are getting knit together-a decrease, in order to keep the total number of stitches the same.  It is a stitch used in all lace patterns.  I wasn’t sure what exactly yarn over meant before this project (I’m a self taught knitter), and I found dummies.com’s description helpful.  I knit using the continental method, so the first two YouTube videos I found on Google didn’t help; they were for the English method.  When I first watched the two videos, I thought, “Oh God, have I been knitting wrong all along?”.  No, just a little bit different technique!

I am going to knit myself a cowl using 1 1/2 skeins of yarn to try to get the 36″ length (the other 1/2 a skein will towards a cabled beret).  I might try 28 stitches to get the 12″ wide, but I really like how wide my mom’s is.  I think I might add smaller buttons (or toggles?) attached behind the large button to make the wear-ability even more versatile. Maybe I’ll even post a picture of me, when I get my set done!  I’m excited for my new matching set!  I normally don’t knit for myself too much, and my mom bought me a new coat and leather gloves (purple to match my cowl and hat, of course), but I don’t get it until Christmas.

Tips on how to knit?  Finished projects? Add ’em in the comments!

Happy knitting!

Pinterest Turned Me into a Hippie

Like every woman I know, I can kill a productive evening with Pinterest.  Of course I have the obligatory home , holidays, style, DIY/crafts, food, and humor boards.  I also have a knitting board, but my most recent favorite is my Beauty, Bath, Hair, and Nails board.  I am conservative pinner; I only pin things I think I can make/afford/get my husband to do (or things that make me laugh).  Seldom do I pin things as a dream; at my core, I am a realist.  I started seeing all these pins about homemade beauty products.  I just kept dismissing the pins as “those crazy hippies who don’t shave and make their own soap”.  But I just kept seeing them, and one piqued my interest.  It was a pin about an oil based facial cleanser.  I remember reading an article in a beauty magazine a while back about oil face cleansers and moisturizers, which helped to give the pin some credibility.  I clicked on it and read the blog of someone who tried it.  Her results were noticeable and what she said made sense (she has done her homework).  It is supposed to help hormonal and cystic acne.  I have noticed more cyst style acne on my face, and I never used to get that kind, so I decided to try it.  What do I have to lose?

I’m here to report my experiences with the oil cleansing method.

First off, it is super cheap.  I only needed three things (all of which I can pronounce, unlike the ingredients on my bottle of face wash):

1. Extra Virgin Olive Oil (EVOO),

2. cold pressed castor oil, and

3. a container to put it in.

Only three things needed for oil cleansing: EVOO, castor oil, and a container.


I had the EVOO in my pantry, but I had to buy the cold pressed castor oil online.  I found it through eBay and only bought a small container, just in case.  They sell castor oil in the laxative section of most grocery/drug stores, but I wasn’t sure if it was cold pressed.  Cold pressed is how it is processed, and I went with it because I couldn’t be sure how the other castor oil was processed (with chemicals? I’m not a chemist.).

There are three ways to mix the two.

1.  Oily skin: 1 TBSP EVOO for every 3 TBSP Castor Oil

2. Normal/Combination skin: 1 TBSP EVOO for every 1 TBSP Castor Oil

3. Dry skin: 3 TBSP EVOO for every 1 TBPS Castor Oil

My skin tends to be drier, but I wanted to play it safe and did the 1:1 ratio.  As soon as the castor oil came in the mail, I mixed it up!  I put in 3 TBSP EVOO and 3 TBSP Castor Oil into my little 97 cent container from Target.


Here are the steps:

1. Put about a quarter size of the mixture in your clean hands and massage onto your face.  I use it to remove my make-up, too.  I just gently rub off the mascara (until I look like a raccoon).  Oil is a great make-up remover.

2. Soak a washcloth in hot water (don’t burn yourself, duh), ring it out,  and set it on your face.  It needs to be HOT to open up your pores and steam out all the nasty gunk in there. Leave it on your face until it cools off (maybe a minute?), then gently wipe off the excess oil.  I don’t try too hard to get it all off, because it soaks in and keeps my face moisturized.  **BONUS: When I was sick, the steam opened up my nasal passages.

Voila!  My skin is usually supple and rosy red from the heat.  You can splash some cool water on your face to help with the redness, but mine goes away after a minute or two.

The oil cleansing works, because oil dissolves oil that has hardened throughout the day.  The oil also encapsulates dirt/grime and gently removes it, while moisturizing.  Skin needs oil, that’s why it produces it.  Stripping/drying skin out with harsh chemicals only makes it produce more oil, so why fight it?


In addition to oil cleansing every night, a mask and exfoliation need to be done once a week.  I do a mask/scrub all in one.  I’ve read (again, in beauty magazines) that aspirin is good to put on pimples.  I found a recipe for a honey aspirin mask, and I love it.  Apparently, honey is a natural antibacterial, antimicrobial, antiseptic, anti-inflammatory, and moisturizer!  Maybe it can even fix the rattling sound in my car.  Aspirin has salicylic acid in it and will also reduce redness, since it also has anti-inflammatory properties.

Here is how I make my Aspirin Honey Face Mask:

1. Put 3 aspirin tablets (NOT the enteric coated kind)  in a container, and drop 3 drops of water on them (I just run some water on my hand and use my fingers to drop a few drops on there).  The water will slightly dissolve the aspirin.  Mash up the aspirin with your fingers a bit.a  **TIP: Not a fan of aspirin? Instead of aspirin, use a TSP of baking soda.

2. Add a small squirt of honey.

3. Mix it all together and rub on your face using circular motions.

4.  Leave it on for 30 minutes (I’m wearing the mask as I write this!).

5. Wash it off slowly with warm water in circular motions.  The circular motions help to exfoliate.  Sometimes I shower after wearing the mask, letting the shower steam do some work on my face before I wash it off!

I’ve also read that honey can be put on a problematic spot to help it heal.  A paste of 1 tablet of aspirin and 1 drop of water can also be put on problematic spots.  I use the honey if I have pimples I have popped (I know, I know, MOM, I shouldn’t do that).  I put the aspirin on troublesome areas I haven’t popped!

These are the three of the four ingredients for the Aspirin Honey Face Mask.

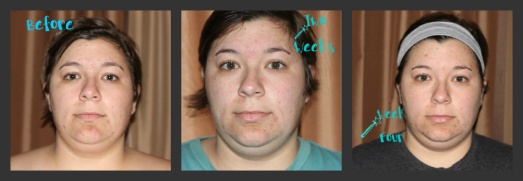
I wash my face before bed with the oil cleanser, following the steps.  Nothing else needs to be done.  In the morning I take a shower, and I use the warm water to get the sleep out of my eyes.  A blog I read said to splash cold water on my face in the morning before putting on make-up, but I am a morning showerer, and I am not about to take a cold shower.  Below are three pictures of me as I use the oil cleansing method.  The first picture was taken after my first oil cleansing wash (I couldn’t use my old cleanser another day once the castor oil came in the mail!).  I forgot to have my husband take a picture on week one and three, but I have weeks two and four.  I noticed that the texture of my face feels much better.  My face is smoother, and I have had no more painful under the skin cyst/pimples.  Simply having no pain is worth it!  I have noticed my acne scars fading (I still have a million light little freckles, but I love those).  My make-up goes on smoother, too.  Even without these good things, I would use the cleanser, because it is so cheap and it didn’t make my face worse!  Why would I keep paying more money to have the same benefits?  But in my case I got many more benefits.  I think if I quit picking at my face (an anxious habit), I will have no more spots to worry about.  Even the pimples I do get heal much faster and don’t scar.  I’m impressed, although I know this won’t be for everyone.

Before, two weeks, and four weeks pictures. I don’t think they quite do the change justice!

Over the past few weeks I have been reading up on other remedies and trying some different things.  Pure aloe is healing and moisturizing, and sometimes in the mornings I feel like I need a little moisturizer, especially when it’s cold.  So I bought a small 100% Aloe Vera gel bottle at Target in the travel section.  I put it on after I get out of the shower to lock in moisture.  It’s very light and dries quickly.  I have another heavier moisturizer trick up my sleeve, but this post is already so long; I will save it for another day!  Here’s a hint: it comes from one of my favorite fruits!

This tiny bottle of Aloe Vera has lasted me a month so far. I only need a little bit!

I will update this and add more pictures as the weeks go by!  Feel free to ask questions and leave tips in the comments!

A Ticking Clock

The husband and I were talking about having a baby today. Let me back up. Yesterday, one of my favorite people in the world, Allyson, got married. I took a few pictures for her bridal shower invite and blogged about it in: I Shot Allyson. We’ve known each other since she was five and I was eight. At her wedding there were tons of cute photos of her and her brothers when they were little. I don’t have any brothers and sisters, but I consider Allyson and her three brothers my family/siblings. I babysat them when they were young! This brought on my husband’s comment about how he wanted a little one of our own. He said he’s ready. I think I might be ready… So the plan is to “poop one out” as husband says next May (not this May as in 2013, but NEXT May 2014, MAYBE). It’ll be the end of my second year as a school counselor, and I’ll be ready to pop after finishing my classes for my doctorate. I figure I can take my time to write my dissertation while I care for my baby!

This had me thinking about that baby hat I knit for a photo shoot for Love and Grace Photography . I completely forgot to add the gorgeous pictures they took! It’s also time for me to knit a baby hat for Minna, who is one half of Love and Grace Photography.

For the original post and knitting pattern see: Size Doesn’t Mater.

This is baby Ryder in the hat I knit.

So adorable!

Minna said the pictures with my hat were her favorites!